Conceptual Drawing
CDIL – 209 – 03
Fall 2011 – Tuesdays 2 – 6pm
Tower – Room 613

Welcome
Welcome to Conceptual Drawing, the single greatest class that you will ever take. On a Tuesday afternoon. In the Fall. In 2011.
Intention
It is important that you check this blog at least once a week, because it will display:
· A summary of the important things that came up in the previous class
· Reminders of what is expected for the next week’s class
· Examples of your and your classmates work produced for this class
· Examples of professional artists’ work that are related to our class material
· Valuable links to artists’ work and related course material on the web
· Comments from you and your classmates regarding your and other artists' work
· And a whole bunch of other cool stuff
Summary
There are two basic parts of Conceptual Drawing:
1. We will spend half of the semester getting really good at observational drawing in the Classical European Tradition. Hardcore. Lots of drawings from still life objects and the human figure. By mid-semester you will have the ability to masterfully observe the 3 dimensional world and to translate it into the pictorial language of line, shape, and value.
2. The second half of the semester will be dedicated to CONCEPTUALIZATION. We will still be drawing from observation, mostly from the human figure, but instead of re-presenting the figure based on strictly realistic observation, we will use the figure as a basis upon which we will manipulate the lines, shapes, and values that we see- with the intention of conveying a certain idea or aesthetic.
For example:
Line
Observational Line Drawing: Ingres (pronounced AHHH-ungh)

A contour drawing in which Jean Dominique Ingres primarily uses line as an element to separate one shape from another. To see more of Ingres’ work, see: http://beardedroman.com/?p=161
Conceptual Line Drawing: Leon Steinmetz

Here is a drawing by one of the greatest teachers I’ve ever had, Leon Steinmetz, who actually teaches right here at MASSART! Look at this small line drawing done with brush and ink. Those are lines right? Or are they shapes? What’s the difference between a line and a shape anyway? See more of Steinmetz energetic work here: http://leonsteinmetz.com/bio.html
Value
Observational Value Drawing: Michelangelo
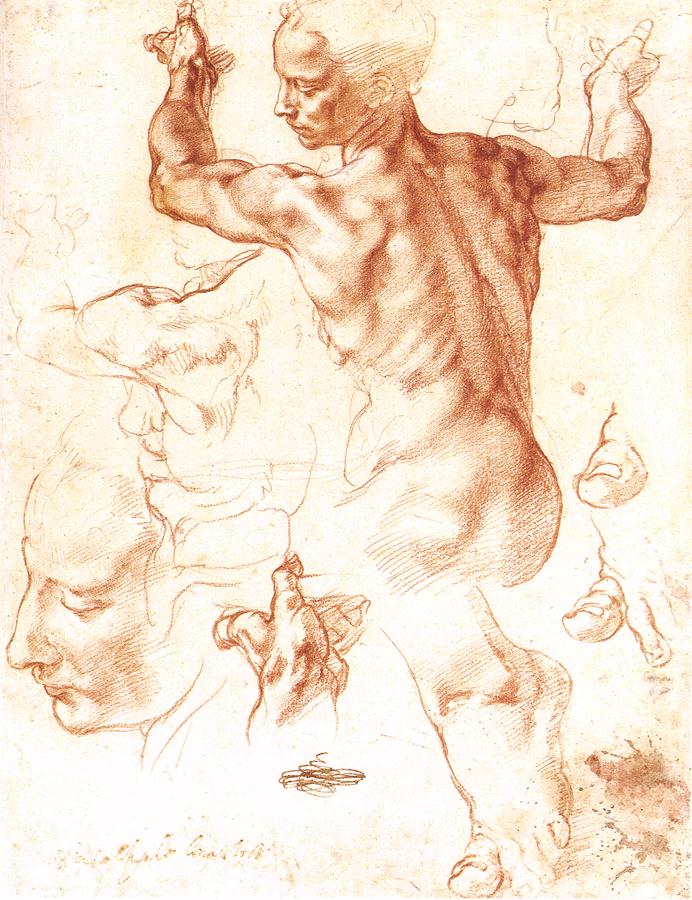
We all know how beautifully Renaissance artists could use VALUE to round form- one of the finest examples is Michelangelo’s Libyan Sybil.
Conceptual Value Drawing: Mark English

Here’s a drawing by one of the greatest illustrators ever- Mark English. If you haven’t heard of him, you better get on it. How is Mark English conceptualizing VALUE here? What do you think his concept is when he draws from the model like this? Think about it. We’ll talk about it soon in class. Watch Mark English draw the figure here: http://www.youtube.com/watch?v=EJK3jph-7Ac
Also check out his amazing fine art work here: http://www.markenglishonline.com/
So that’s the kind of stuff that we’ll be getting into in Conceptual Drawing. I will attach the in depth syllabus soon. You will each receive a copy on the first day of class.
Supply List
As I mentioned in the email- BRING YOUR SUPLIES to the FIRST DAY OF CLASS. We will be using them right away.
Below you will find a handy guide that lays out the supplies that you need. As you know, all items on list are easily found in many of the good art supply stores in the city. I encourage you to shop around for the best deals, and to be economical in your choices- just don’t skimp on a good product if there’s only a small difference in price between it and something of lesser quality. I am recommending the brands that I have found to work the best- they are the highest quality for the most reasonable price. Please get exact sizes
Drawing Board

About 26” x 24” (size will vary from brand to brand- just make sure it’s big enough to hold 24” x 18” paper) clamps on top, big ole elastic on bottom (elastic is important to keep the paper steady for our horizontal oriented drawings like still life works or reclining figures) It can double as your portfolio, upon which you can bring your pads and homework into class
Newsprint

24” x 18” pad of newsprint paper (for in-class studies) brand and texture is up to you
Drawing Pad

24” x 18” pad of good drawing paper- 70lb, 50 sheet, wire bound pad. Acid free. I like Utrecht brand; Canson or Strathmore are good too.
Bring the board and 2 pads every day to class.
Plumb Line

This will be our tool for finding vertical lines in our observed subjects. The basic idea is that we want to create a pendulum like tool that can be held steady and work with gravity to indicate vertical lines. I use a black cord that I got from an arts and crafts store, with a weighty object tied to one end. They sell this kind at hardware stores:

A fishing weight works well; a nut can be good too. (like the kind that goes with a bolt, not like a macadamia).
A fishing weight works well; a nut can be good too. (like the kind that goes with a bolt, not like a macadamia).
Above you can see contemporary realist painter Zack Zdrale using his plumb line.
See more of his work here: http://www.zackzdrale.com/
Straight Edge

We use the plumb line to find perfect verticals- we use the straight edge to find perfect horizontals. Get a paint stirrer from the hardware store. They are FREE. Bring it in to class, it’s part of the first homework assignment- I’ll explain the rest later.
Charcoal Pencils

6 General’s Brand Charcoal Pencils
As you know, charcoal comes in different densities. Pictured here is a hard pencil- please get:
2 Soft
2 Medium
2 Hard
Vine Charcoal

We will be using this to fill in broad shapes with 1 solid tone. Get a couple of boxes.
Windsor & Newton- Soft
Compressed Charcoal

We will need a couple of sticks of this powerful soft black awesomeness. Again, I have found General’s to be the best. Get 1 package of the skinny ones, and 1 package of the jumbos, as seen above. Get the charcoal- not the graphite.
Knife

You will need an Exacto, or utility knife for sharpening your drawing tools, especially the pencils. Exactos are great, but it is important that they stay sharp- don't go buying a million of those little replacement blades- get a sharpening stone:

Chamois

Get a chamois for gentle erasing and blending. They sell’em in a lot of places, but get one from an art store.
Kneaded Erasers

2 of them for hardcore erasing. Brand doesn’t matter- get the big kind though.
Also get a sack for storing all this stuff in.

Sketchbook


Keep one with you, not only in my class, but everywhere you go. You should be doing at least 2 pages a day, even on national holidays. Drawing- be it imaginary or observational, quick or sustained, is the basis of everything that we as artists do.The best way to get good at drawing is to do it incessantly. The best place to do it incessantly is in a sketchbook. I prefer the small kind- no bigger than 9”x7”. I take it everywhere I go- fits easily into cargo pockets, purses or fanny packs. Perfect for drawing on the T.
No comments:
Post a Comment